Traditional Spinach Dip

Posted by Mandy on October 18th, 2010

I don’t know about you, but when I’m planning a party no menu is complete without Spinch Dip. It’s absolutely delicious, easy to prepare ahead of time, and always a people pleaser. I also like to kid myself and tell myself it’s good for me, after all it’s full of veggies right? :) Okay, so maybe it’s not all that healthy but the total deliciousness (is that even a word?) makes up for its lack of health benefits. I personally like to substitute canola mayonnaise and light sour cream for the traditional varieties to make it a little more healthy. No one ever notices the difference!

There are a gazillion varieties out there, but this one is my particular favorite. Make it for your next get-together and neither you nor your attendees will be sorry.

Traditional Spinach Dip

1 pack (10 oz.) frozen baby spinach, thawed

1 (16 oz) container sour cream

1 cup mayonnaise

1 package vegetable recipe mix

3-4 green onions, chopped

Drain all of the water off your spinach well. Mix all ingredients and chill. Serve cold with cubed Hawaiian bread or crackers.

Homemade Buttermilk Biscuits

Posted by Mandy on October 17th, 2010

As you may have read in the “About Me” section of this blog, I’m a Southern girl and come from all the way down in Central Mississippi in God’s country. Mississippi is, after all, the nation’s best kept secret. People say that the South is full of a bunch of dumb people that talk slow and can’t do much of anything other than farm. I say let them keep thinking that because that just means fewer people down here to be bothered with. :)

Anyway, a Southern cook’s recipe collection can never be considered complete without a good ole Southern homemade biscuit recipe. I grew up in a family that, strangely enough, never seemed to make our own homemade biscuits. I only remember eating biscuits on one occassion, and that was always when my “Mae Mae” would make her tomato gravy. My husband, though, grew up in a family that apparently made homemade biscuits quite often with homemade chocolate gravy. After his coaxing, I finally decided it was high time that I found a recipe for biscuits to call my own. I still to this day have never tried chocolate gravy, but will have to do that just to perfect the recipe and serve Matt a food that brings back so many great memories. In the meantime, though, the plain biscuits here will have to do. I hope you enjoy these as much as our family does!

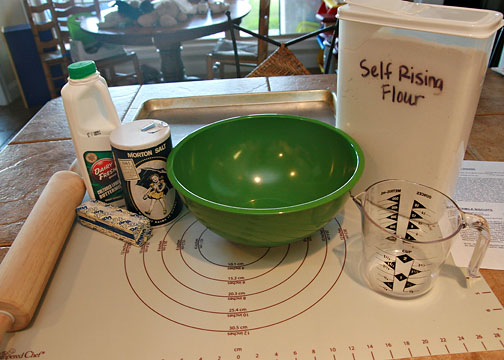
Start by getting all of your ingredients together. You’ll want your cold items (buttermilk and butter) as cold as you can possibly get them without them being frozen. Be sure to get out all of the cooking utensils you’ll need as well because once this process gets started you will most likely have dirty hands and won’t want to be reaching in your kitchen drawers dirtying everything in them. I am missing my pastry cutter and biscuit cutter in this photo and didn’t realize it until my hands were already dirty.

In a medium sized mixing bowl, mix together the flour, sugar, and salt. Cut the butter into small cubes by slicing once down the middle, and turning it and slicing again. Then slice cross-ways into about 1/2″ slices. Place the butter into the bowl with the dry ingredients. Using a pastry cutter (or a fork), cut the butter into the dry ingredients until it resembles coarse meal. You DO NOT want the butter completely mixed with the dry ingredients. The little pockets of butter are one thing that makes these biscuits so buttery-delicious.

Make a small well in the center of the bowl and gradually add the buttermilk, pouring slowly and mixing with a fork as you do. Be careful not to overmix the ingredients or you will wind up with dry biscuits, and that’s definitely not good. (Just ask Matt…he has no problem telling me when things don’t taste good!) Only add enough buttermilk to make sure the ingredients are just moist, you don’t want them really wet because then your dough will be too sticky to roll out.

Place the dough onto a floured counter or pastry mat and with a heavily floured rolling pin (and hands), roll the dough out until it’s about 3/4″ thick. Using a biscuit cutter, cut your biscuits and place them on a baking sheet sprayed with non-stick cooking spray. With the pile of dough that you have left, roll it out again and cut more biscuits until you are almost out of dough. I usually have a tiny bit left that won’t make a whole biscuit so I just throw it away. Bake at 450 degrees until the tops are light brown, about 10-12 minutes depending on your oven.

Serve immiately, while they are still really hot for the best flavor. We like to top ours here at home with either butter, homemade jelly, or syrup. Yummy!

Homemade Buttermilk Biscuits

2 cups Self-Rising flour

3/4-1 cup buttermilk

1/2 teaspoon salt

1 stick butter

1 teaspoon sugar

Preheat oven to 450 degrees. Mix together dry ingredients in a medium bowl. After cutting it into chunks, cut butter into flour using a pastry cutter or fork. Make a well in the middle of the dry ingredients and gradually add the buttermilk, stirring with a fork to incorporate. Add only enough buttermilk to slightly moisten the dry ingredients so that your dough doesn’t get too sticky to roll it out; you probably will not need the entire cup. Roll out dough onto a floured work surface to about 3/4″ thick. Place on baking sheet sprayed with non-stick cooking spray, continuing to roll out remaining dough until it’s all gone. You may have end up throwing away a small amount. Bake until the biscuit tops are light brown, usually about 10-12 minutes. Serve hot!

Pepperoni Rolls

Posted by Mandy on October 15th, 2010

This recipe is one that I kind of made up myself. There is a local bakery here that makes something called Pepperoni Bread, and it’s absolutely delicious. Being on a budget with three kids, one of whom requires numerous surgeries a year done halfway across country, I find it very difficult to spend $8 or more on a loaf of bread that will only last a few minutes. It makes me feel awful though because the kids love their pepperoni bread so much. So I set out on a mission to come up with something similar so that they could enjoy themselves without breaking the bank. I originally started making this as a loaf of bread, but this time when I made it I rolled the dough out too far and ended up with a loaf of dough too long to fit into a loaf pan. That’s when I decided that cutting the bread up, cinnamon roll style, would make cute little pepperoni rolls for serving as appetizers. I don’t have to say how good this is, because the photos and recipe will speak for itself. I made these late in the afternoon with my kids a couple weeks ago, and when I went to wrap them up to store for a later day I saw that there were only two rolls left. Matt had eaten only one of them and I had gotten none, the kids had devoured the rest of the pan themselves!

Start by taking a loaf of frozen bread dough and following the directions on the package to thaw it out. Before it starts to rise, sprinkle a pastry mat (or your kitchen counter, I have tile and find it difficult to work with dough without it getting into the grout) with plenty of flour. Roll out the dough with a rolling pin until it’s a large rectangle. Okay, truth be told, it’s a lot more difficult to roll dough out into a rectangle that cookbooks like to tell you…but this is what mine looked like. Once the dough is rolled out, spread it with either melted butter or spray it with the kind in a spray bottle. Sprinkle it with some Italian seasoning, Mozzarella cheese, and then top with pepperonis, much like you would a pizza. And yes, those are my little angels helping me bake. If I’m in the kitchen, chances are they are most likely in there with me so you guys will probably be seeing a lot of photos with their little arms in them. :)

Next roll up the bread cinnamon roll style, so that you end up with one long loaf of bread. Cut across the loaf so that you end up with pieces that are about 1.5″ thick. Place them into a baking dish that has been sprayed with cooking spray so that they don’t stick.

Let them rise until they are “doubled in size”…what the heck does that mean anyway? I love yeast breads and make them all the time but hate seeing this in a recipe because I don’t have a clue in heck what they are talking about. So I just let them rise until they are the size that I think they should be. :) I think these rose for about 1 hour after the above picture was taken.

Speaking of…did you know that you can rise yeast breads in your oven? Personally, my favorite place during the summertime is outside in the garage because living in Missisippi we definitely have enough heat to rise breads. But when it’s not summer I just turn my oven onto it’s lowest setting (175 degrees I think) and then turn that baby right back off. Stick the dough in there and it rises just right. Technically you are supposed to rise yeast dough in a place around 85 degrees but this has always worked for me so why change things?

So now that your dough has risen, plop it in a 350 degree oven and bake until golden brown, like this photo.

My kids like to eat theirs dipped into some warm pizza sauce. Yummy!

My guess is that your mouth is watering by now so I won’t hold you up any longer. Head on out to the grocery store and pick up the ingredients, ’cause you won’t be sorry!

Pepperoni Rolls

1 loaf frozen bread dough

shredded Mozzarella cheese

Pepperonis

Italian seasoning

butter or spray butter

Prepare dough for handling by following instructions on the package for thawing. Spread dough out onto a floured surface and roll out to a large rectangle. Either spread with melted butter or spray with butter spray. Sprinkle lightly with Italian seasoning and Mozzarella cheese. Top with pepperoni slices. Roll up, cinnamon roll style, into a long loaf. Cut the loaf into pieces about 1.5″ thick. Put pieces, cut side down, into a baking dish sprayed with nonstick spray. Allow to rise in a warm place until doubled in size. Bake at 350 degrees until golden brown. Serve warm with pizza sauce, if desired.

Mom’s 7-Up Pound Cake

Posted by Mandy on October 14th, 2010

I grew up in a household that ate mainly healthy foods, so a cake in the kitchen was a very rare occassion. Luckily for we three kids, my mom was a pro at making this yummy cake! This cake brings back so many good memories because I remember my mom making it often, especially for the cake walks at church. And why not? It’s an absolutely delicious cake that never fails! I have a bad track record of baking bundt-type cakes that seem to stick, but this one has never let me down. As a matter of fact, I made this cake yesterday for the church bake sale to be held tomorrow at the Canton Flea Market. The kids were begging so bad for a slice that I promised them I’d bake them one today. Who am I to refuse sweets when I could live off of cake alone? If you don’t have any 7-Up lying around, feel free to use Sprite instead…that’s what we did here. I baked it just today and I’m eating some as I write this and maybe, just maybe, I might go back for another piece.  I have been known to do that on occassion. Oh who am I kidding? I do it every time!

Mom’s 7-Up Pound Cake

2 sticks butter, softened

1/2 cup shortening

3 cups sugar

7 oz. 7-up

5 eggs

1 teaspoon lemon extract

3 cups flour

Cream butter, shortening, and sugar. Add eggs, one at a time, beating after each. Add lemon extract. Add flour and 7-up, alternately. Bake in a greased and floured Bundt pan at 300 degrees for 1 1/2 hours (my cake was done at one hour and twenty minutes). Let cool about 20 minutes in the pan before turning out onto a cooling rack.

BLT Dip

Posted by Mandy on October 12th, 2010

This is my first true recipe post, so please bear with me. I’m sure I’ll be messing this up for at least the first couple of months. I know how to work computers to do the basic things, but I have NO idea how to do website work, which is where writing a blog falls in my book.

When I say this dip is addicting, I really mean it! I made it for a family reunion back in May, and within just a few minutes it was gone! Everyone gobbled it right up. My cousin liked it so much that she requested it when I threw Adee and Emme’s birthday party back in June. I hope you enjoy this as much as we do!

BLT Dip

1 cup mayonnaise

1 cup sour cream

1 lb. bacon, cooked & crumbled

shredded iceburg lettuce

chopped tomatoes

Mix together mayonnaise and sour cream. Spread into a medium sized baking dish. Sprinkle with shredded lettuce, followed by chopped tomatoes. Sprinkle the bacon over the top. Store in refrigerator until ready to serve with tortilla chips or corn chips.

Welcome!

Posted by Mandy on October 12th, 2010

Welcome to my brand new recipe blog! Please come back soon for recipes!

The above picture is pepperoni rolls that are rising on my stove. I’ll be posting that recipe soon because they are so yummy!